
|
|
|
|
||||||||||||||||||||||||||||||||||||||||||||||||||||||||||||||||||||||
|
Photoshop will allow the use
of the zone system to verify the quality of a digital file. By choosing
grayscale for one of the two Show Info options, Photoshop will display
a 0-100% (dot percentages) scale from which you can infer 0-10. Be aware
that 0 (threshold) in the zone system is black and differs from 0 in grayscale
which is white (printer's inks start their threshold at white paper which
has no ink). You will need to invert the numbers. To arrive at the zonal
value from the grayscale report, subtract the dot percentage from 100
and move the the decimal one place to the left. 35% from 100 is 65. The
zonal value is 6.5 (VI 1/2). The following relationships apply. 256 level
values follow for applications that do not report ink densities.
If, for instance, you place caucasian skin tone on zone VI, it will read 40%. That is a reasonable placement for skin tone; verifying the reflectance in the software will guarantee your wishes for that density (and every other important value you place and verify) on your intended target; if it isn't modified by someone else. That modification is where the process of placing images on a printing press can become obscure. Actually, any output (Iris for example) generated by an outside imaging service can become difficult. Separators for exmple will often "adjust" your files for proper output to a given target. Consider sending a color neg to a custom lab. If you don't like the print, the lab will remake the print to your liking. They will often do it for no charge. Service bureaus and color separators traditionally do not extend the same service to photographers. You pay for any misunderstanding in the emotional translation of your image onto the imaging service's media. Inclusion of the highest quality output you can generate (a print for example), along with your file will go a long ways toward generating success on your first try when using the outside service. It's like sending a transparency along with the color neg, it's something to match. The advent of cheap, high resolution inkjet printers (720-1440 dpi) can help the photographer communicate his emotional intentions to the outside service. The use of a system to predict and verify any value in the transition of tone from hightlight-to-shadow is perhaps the most important tool for the generation of high quality emotional content in the imaging process. Knowing the final result breeds confidence. It also allows creative departure from reality (abstractions for instance) and makes the problem solving of difficult situations more easily accomplished. Using the zone system to aid
the manipulation of digital images should start and end with curves. If
you are scanning film based images you will begin with a file and you
will choose the final transition of tone with a curve. If you are capturing
with a digital camera you will start with a file. If the camera is tethered
to a computer, you'll use a curve to choose custom transition of tone
in the displayed image. If you are shooting a non-tethered camera you'll
open the image in an image editing software package and you'll want to
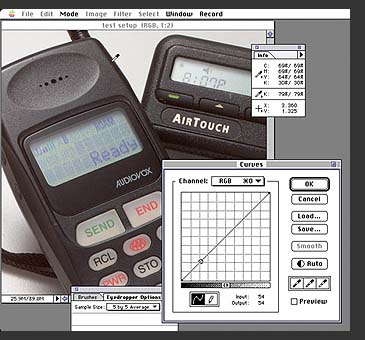
adjust its transition of tone with a curve. How does one use the zone system on a digital image? If you use capture software, adjust the image through lighting, exposure, and f-stop to control total contrast as well as local contrast. Make sure the most important values read correctly within your zone system experience. If you cannot craft the image through the image capture software you'll need to make a stop in an image editing software application. More often than not, the application of curves will be implemented through Photoshop's Image> Adjust>Curves function. In image #1, Photoshop is displaying 79% (or Zone II) in the small Info box (K: ) for the eyedropper indicated shadow on the edge of the cell phone. Photoshop also indicates where the sampled value falls on the characteristic curve. 79% is located just above the second line from the bottom along the indicated transition (here it's linear) from shadow to highlight. Note that pre-press professionals start with their threshold on the left indicating zero ink. Click the arrows in the middle of the bar below the grid to change from shadow/left to highlight/left.
|
||||||||||||||||||||||||||||||||||||||||||||||||||||||||||||||||||||||
|
|
||||||||||||||||||||||||||||||||||||||||||||||||||||||||||||||||||||||

 Key
to the digital process, just as in film, is applying the proper number
of tones to the intended target. Just as you can't effectively print a
neg scaled for grade 2 paper on grade 5 paper, you cannot easily print
a file scaled for a high quality sheetfed stock on newsprint. Curves can
change the number of tones and their transitions. Refer to any number
of good texts available on the application of curves.
Key
to the digital process, just as in film, is applying the proper number
of tones to the intended target. Just as you can't effectively print a
neg scaled for grade 2 paper on grade 5 paper, you cannot easily print
a file scaled for a high quality sheetfed stock on newsprint. Curves can
change the number of tones and their transitions. Refer to any number
of good texts available on the application of curves.